Showing posts with label Planted Aquarium. Show all posts

Wednesday, April 1, 2015

A Complete Guide to Setup a CO2 system


If you ask any of the aqua hobbyists, they will tell you one of the most important factor for a successful planted aquarium, is the injection of CO2.

In planted aquarium, CO2 is often the limiting factor. With higher CO2 level, aquarium plants flourish and grow. Without sufficient CO2 level, plants are unable to utilize the necessary nutrients, and instead allow algae to grow.

Pressurized CO2 System is the best and most effective way for introducing CO2 into your aquarium.

Equipment for pressurized CO2 system can often looks complicated to a beginner hobbyist. Today, we like to break down the installation to few simple steps   

What is commonly found in pressurized  CO2 system?

Items
Usage
CO2 cylinder
Storage of CO2
CO2 regulator
Regulate the speed of CO2 release
CO2 Bubble counter
Allow user to calculate the speed of CO2 release
CO2 check valve
Prevent aquarium water to flow into the CO2 cylinder
CO2 tubing
Connect the regulator to the diffuser
CO2 diffuser
Create CO2 micro bubbles in aquarium, allow more CO2 to dissolve in water


We will use our ANS Professional CO2 System to demonstrate the setup. In the later part, we will give more details and properties for each items used.


CO2 Cylinder
CO2 cylinders basically store your CO2! It usually comes in aluminum or alloy steel material. Aluminum cylinders are lighter and have better appearance and are more expensive. Alloy Steel cylinders are durable and cheaper!  


ANS Alloy Cylinder 
ANS Alloy Steel CO2 Cylinder is durable and able to withstand high pressurizes CO2. Built in with safety mechanism that prevent any sudden leakage of CO2.
Come in 2L, 3L and 5 Liter cylinder. Choose your cylinder capacity well. Usually, a 2L will last about 4-5 months for a 60 Liter aquarium. You will not like to travel more often than necessary just to get your CO2 Cylinder refill!


CO2 Regulator
CO2 regulator regulates the speed of CO2 release. There are 2 types of regulator (manual/automatic). We usually recommend user to use automatic regulator.

Manual regulator (picture below) has 1 pressure gauges.
ANS Easy CO2 Meter (Precision)

Manual regulator is cheaper, no frills regulator.  It allows CO2 to be controlled and release from the cylinder. However, the CO2 release can be unstable and it will be hard to adjust the amount of CO2 release. It is because manual regulator relies on CO2 cylinder pressure. As CO2 in cylinder gets lesser, CO2 pressure in cylinder decreases, hence affecting the amount of CO2 release. So if you leave your manual regulator on running, you will find the speed of CO2 injection getting slower over time, even if there is CO2 in the cylinder.

Automatic regulator (picture below) has 2 pressure gauges.

One measures the capacity of CO2 stored in the CO2 cylinder. The other measures the output pressure, output pressure gauge provide constant amount of CO2 release regardless of the capacity of CO2 in the cylinder.

ANS CO2 Regulator with solenoid is a 3 in 1 regulator
1. Creates a constant output pressure of 50-60PSI.
2. A fine tune adjuster that allow user to adjust amount of CO2 release accurately and precisely.
3. Integrated solenoid control!


What is the use of solenoid?
Plants need CO2 when light is on and CO2 injection is unnecessary when light is off. Solenoid is use to turn on and off CO2 by simply switching on and off the electrical supply.

Electricity ON = CO2 injection
Electricity OFF = CO2 supply cut off!

Some will ask if they use regulator without the solenoid as they can manually turn the fine tune adjuster off at night and turn it on daily! However, from a season hobbyist, most will tell you this daily ritual can be very tiring.  It will be easier to control the CO2 by just a flip of a switch.  Furthermore, you can also connect ANS CO2 Regulator with solenoid to common electronic 24hr timer.  With this you can leave the system running for months without you touching it. 

Solenoid on a timer


Bubble Counter
Bubble counter is use to measure the amount of CO2 injected into your aquarium. It is important to know how much CO2 is injected to your aquarium as too much CO2 may suffocate your fishes and shrimp, while too little will stunned the growth of plants. As a guide, a fully planted aquarium should inject 1 bubble/second for every 30 – 45 liter of water. You can also get a CO2 Checker to check the amount of CO2 in your aquarium.


ANS Brass Bubble Counter


ANS Brass Bubble Counter is fabricated out of brass metal and thick glasses that can withstand high pressurize CO2 output without losing shape. It clear glass column allows easy counting of CO2 bubbles. It is also integrate with a brass check valve to prevent back-flow of water.


Check Valve (One Way Valve)
Check Valve prevents water from aquarium to flow back to your CO2 cylinder. It is important to have a check valve because if water enters the cylinder, it can cause rust in the interior of the cylinder and prevent proper CO2 refilling.

ANS CO2 Brass Check Valve

ANS Brass Check Valve is an excellent check valve that prevents no water flows back to your CO2 Cylinder even under high pressurize CO2 output.


CO2 Tube
There are many types of tube available. We do not use the same that we use with air pump.  The common air pipe will not be withstand the pressure needed for CO2 system and may leak CO2 after sometime.

ANS CO2 Resistant Tube
ANS CO2 Resistant Tube is design to support high pressurize CO2 output and do not degrade over time.


CO2 Diffuser
CO2 Diffuser are use to diffuse CO2 efficiently into your aquarium. There are various types of diffuser available.


ANS Opti Glass Diffuser Nano
ANS Opti Glass Diffuser Nano creates micro bubbles through a ceramic disc that effectively diffuse CO2 into the water. The more CO2 dissolved in water the more CO2 available for plants.  So it is important to have a diffuser rather than just a normal air stone. Opti glass material use in the diffuser gives elegant visual effect to your planted aquarium.


CO2 monitor device (Optional)
As all planted aquarium are different, the amount of CO2 intake by plants are different. To measure accurately if the amount of CO2 is enough, we use CO2 monitor device. CO2 monitor device accurately measure the amount of CO2 dissolved in the water.


ANS Drop Checker measure accurately the amount of CO2 in the water. Opti glass material used enhances elegant visual effect to your planted aquarium.


Things to take note when using CO2 System:
  1. Do not place CO2 Cylinder under sun or hot area
  2. Do not place CO2 Cylinder at a damp area
  3. Use high grade check valve to prevent water from flowing back to the cylinder

ANS Professional CO2 System is a complete CO2 System. Come with everything needed for a CO2 system. Plug and play.
ANS Professional CO2 System


ANS Professional CO2 System includes:
  • ANS Alloy Cylinder 
  • ANS Co2 Regulator with Soleniod
  • ANS Brass Bubble Counter
  • ANS High Resistant CO2 Tube
  • ANS Opti Glass Diffuser Nano


******* Join our EOA CO2 refill program *******
We do 1 to 1  exchange of CO2 cylinder when you purchase ANS Professional CO2 System from us. Ready immediately, no waiting required.

Monday, October 20, 2014

Setting up a 3ft planted aquarium for our customer (part 2)

Last week, we setup a 3ft planted aquarium, we went again today to check on the aquarium.
Our customer have introduced fishes into their tank on the 4th day. The fishes are doing great. Amano shrimps are also introduced to eat algae.
Fishes introduced are:
Dwarf Gourami
Rummy Nose Rasboras
Rainbow Tetras
Congo Tetras
Otoculinus
Amano Shrimps


We test the water using JBL 6 in 1 Test Strip. All parameter are good.
No3: 0
No2: 0
GH: 4dh
KH: 3dkh
pH: 6.4
Chlorine: 0

We did 50% water change to remove excess nutrient in the water that comes from the substrate. Although plants should be absorbing the nutrient, but they are still immature at the beginning to absorb all the nutrient in the water. Water change now will help to prevent algae outbreak in the aquarium. This is a very important step.
We change around 50% of the water twice per week for the 1st month until plants are mature enough, than we do water change once per week or depends on tank condition.
During the first week of planting, plants might die as some might be unhealthy or weak due to transport and handling. We replant them during water change as it is easiest to do when water level is low.

Fill the aquarium with water, we add in JBL Biotopol to remove chlorine and chloramines to make water safe for fishes and plants.
After 15 min, we introduce more Amano shrimp into the aquarium, making it to 20 Amano shrimps. (^_^)
We like to add in as much Amano shrimp as possible to a planted aquarium, they are hardworking and clean up algae very fast.

We add in more EIHO Bacter Gold (beneficial bacteria).
JBL Ferropol (Fertilizer) to provide missing nutrients for plants growth
EIHO Plant Carbo help moss to grow easier and also prevent algae growth.
Check equipment and ensure they are working well.

Done!

ANS Clearmax clears cloudy water in planted aquarium

One of our planted aquariums is experiencing cloudy water yesterday. There are many reasons that lead to cloudy water. In this scenario, dead plants or fishes were not removed from the tank.

We did no water change. Instead we introduce ANS Clearmax to the aquarium. ANS Clearmax is a simple to use filter media suitable for freshwater, planted and marine aquarium. It clears cloudy water and improves tank conditions immediately by removing nitrate, ammonia and toxins in the water.

Wash ANS Clearmax with tap water before placing it into filter compartment, this activates it to start absorbing any toxic, ammonia and nitrates.


After 18 hours, our planted aquarium clears up. Crystal clear water is observed

We find this method safest and most effective. Too much water change may kill sensitive livestock like shrimps and cloudy water may still happen after 2 – 3 days. Adding beneficial bacteria clears up the water but it will take time to do so. ANS Clearmax does not harm sensitive livestock and also clears up water within hours. Effectiveness last for 1 month. Changing every month helps to maintain crystal clear water and healthy water condition in your aquarium.

Wednesday, October 15, 2014

Setting up a 3ft planted aquarium for our customer

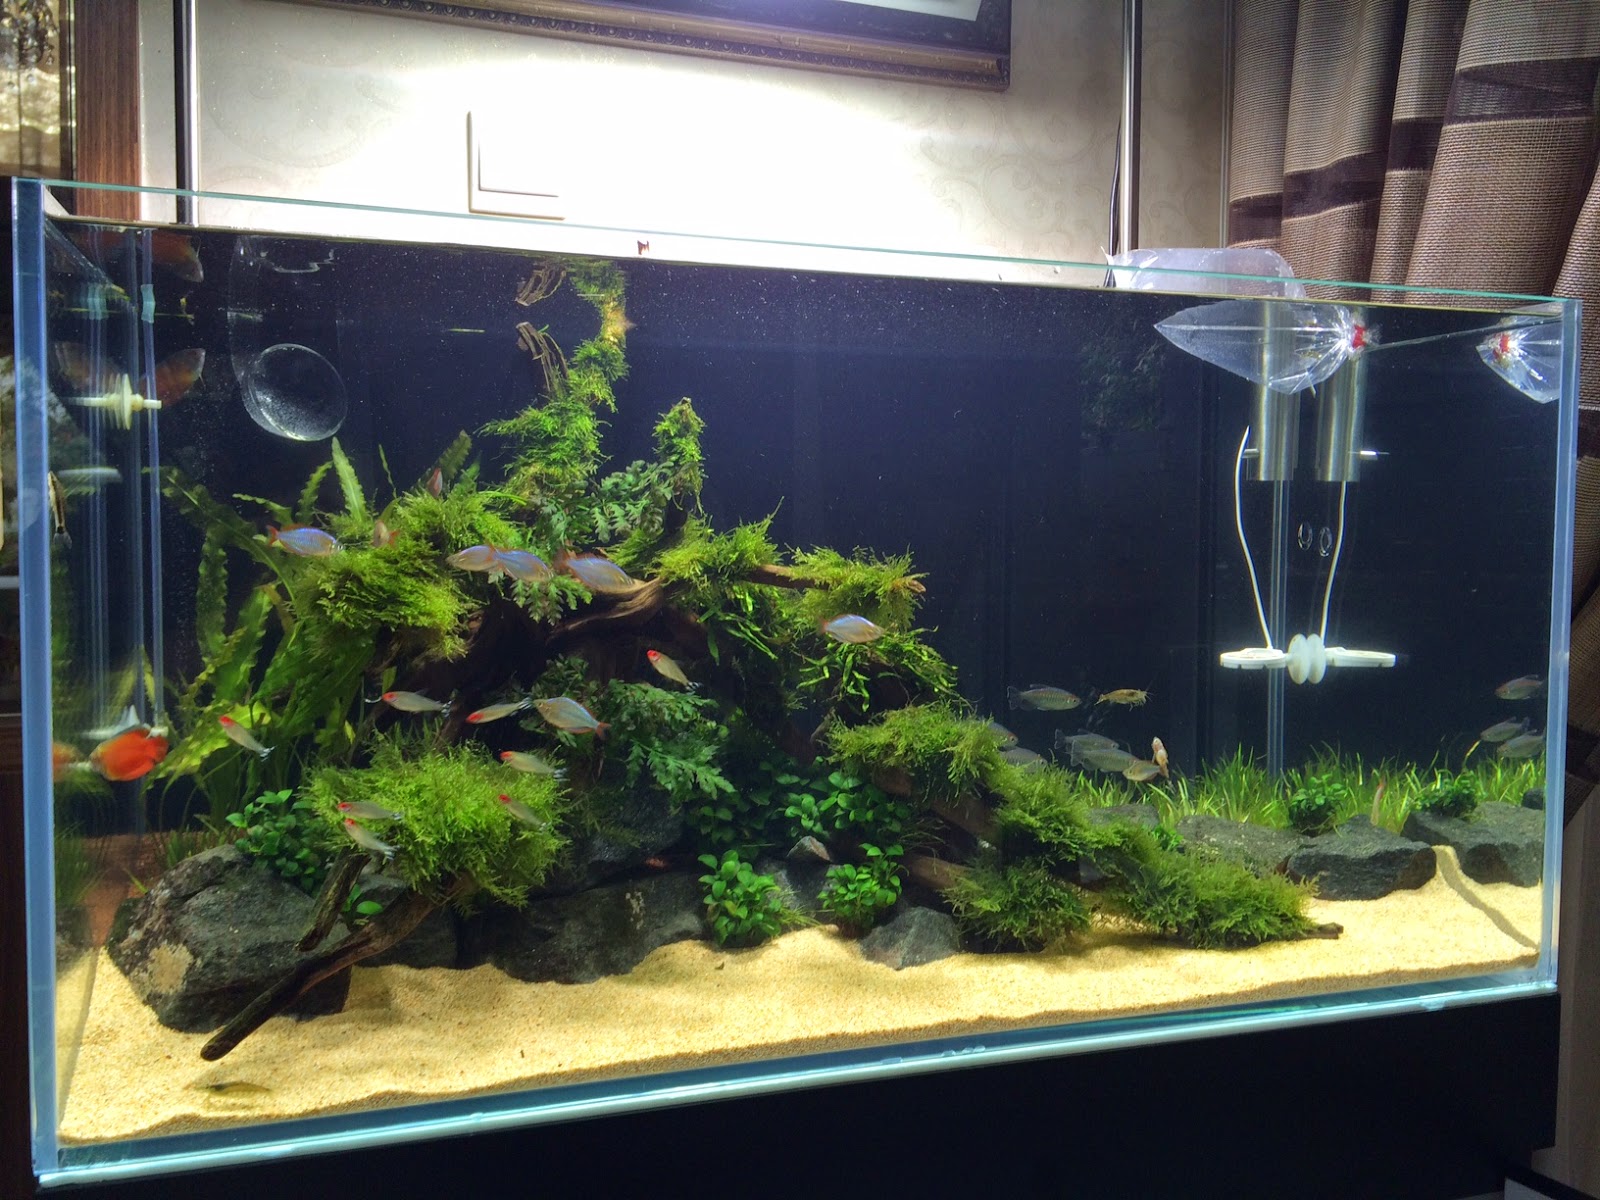
This week, we went to our customer place to set up a planted aquarium. The customer brought our display aquarium at our store.
Our customer wants an easy maintenance planted aquarium; we changed some equipment and plants to suit his needs. We will show you as we talks more.

Equipment we used:
Cabinet: Custom Cabinet (90 x 45 x 80cm)
Hanging Bar: ANS Hydro Bar M90
Lighting: Metal Halide 150w, 2 x 36w PL florescent
Filtration: UP Aqua G055UV
Substrate:  ANS Planta Base, JBL Manado, ANS NatureSand Bright Sand
Plants: Blyxa Japonica, Blyxa Aubertii, Taiwan Moss, Microsorum Pteropus Narrow leaf , Bolbitis Heudelotii, Anubias Nana var Petite, Aponogeton Crispus

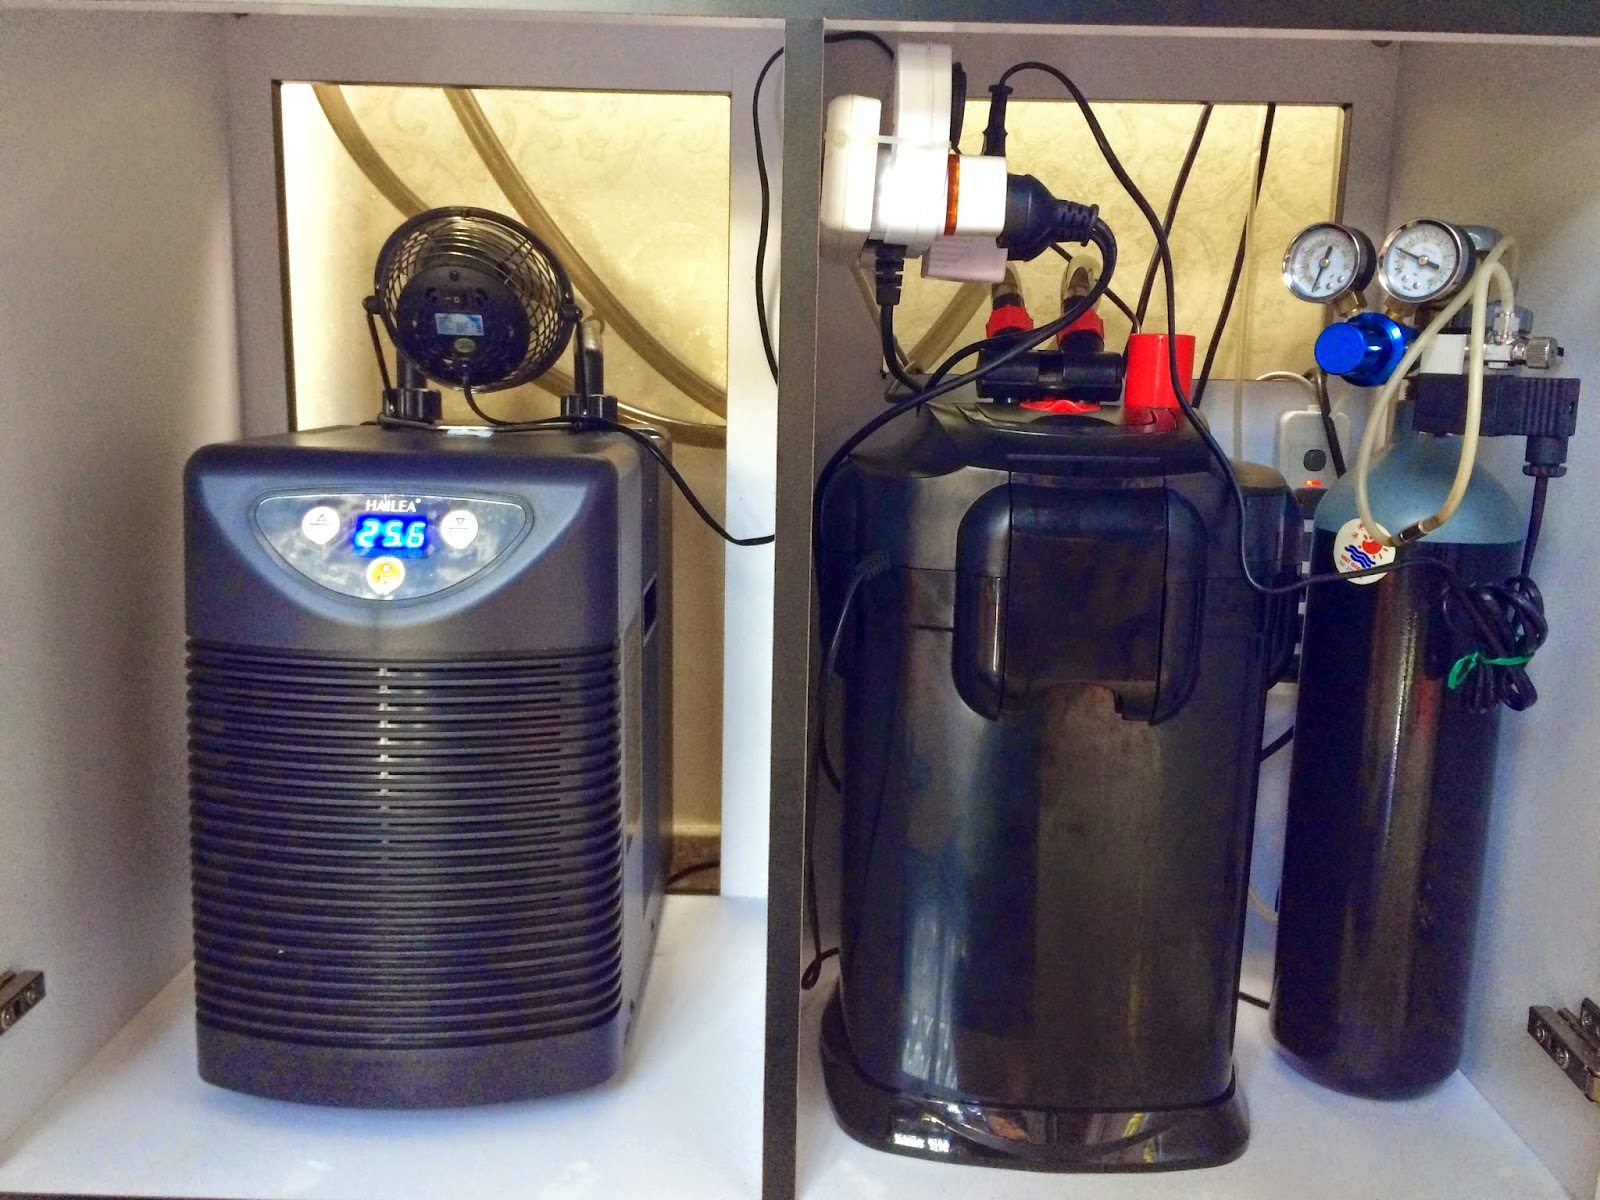
We design the cabinet on the right side to have a bigger hole so hot air from the chiller can be expel easily.

Installed the hanging bar and lighting. we hang light 30cm above the tank, this will helps to spread out the light to every corner of the tank.


Connecting filter to chiller. We use canister filter that have UV-C light, UV-C light help to keep water clear and reduce algae growth. We set temperature of chiller at 25 degree Celsius, this will promote plants growth and also reduce algae growth. (Get a mini fan on the chiller compartment to expel the heat produced by the chiller.)


Start scaping. Start with the wood first. (Sorry for the bad photo)


Add in the rocks. Make a border as we are adding sand at the front and substrate at the back.


After hardscape is done, we add in ANS NatureSand Bright Sand at the front. Try to fill up the sand into every small holes, this will prevent substrate from the back flowing to the front.

Add in ANS Planta Base as the bottom substrate. ANS Planta Base help plants to grow better and also keep the root healthy and strong.


Add in JBL Manado at the top. We like to use JBL Manado as substrate for low maintenance planted aquarium. It increases survivability of plant and enhance root growth. Restrict the growth of algae by absorbing excess fertilizer from the water. Less water change is needed.


Add little water so it is easier for planting.

Start planting. Spray water on the moss and fern between planting to keep them from drying up.

Fill up water and we are done.

We add EIHO Bacter Gold to increase the beneficial bacteria in the aquarium, add in twice every week help break down waste and harmful ammonia, nitrite and fasten the process of nitrogen cycle.

Co2 injection : 4 Bubbles per second

We told the customer to change 25% to 50% of the water twice a week for the first month. It is a very important step to improve water quality for planted aquarium. Add in some Siamese algae eater and Otocinclus on the 3rd day, they help eat up algae in the aquarium.

It is all for today setup. We are going back next week to check on plants and water quality and hopefully we will be able to add in fishes already.


Monday, September 22, 2014

EIHO Ich EX

White spot disease is commonly faced by hobbyist. White spot disease can infected the whole population of fishes in the aquaria. In planted aquaria, it can be difficult to add common Anti White spot medication, as it contains harmful chemical such as copper or malachite green. These harmful chemicals can kill sensitive fishes, shrimps and affect beneficial bacteria
In our retail store, we have been using EIHO ICH-EX to cure and reduce white spot disease outbreak in our planted aquaria.  
EIHO ICH-EX
Cures white spot disease safely
Contain no harmful chemical such as copper or malachite green.
ICH-EX is effective against resistant strains of ich / white spot disease.
Cure Marine white spot cause by Cryptocaryon irritation)
Does not dye aquarium water.
Safe for planted aquarium, shrimps, corys and pleco (scaleless fish).
Does not affect beneficial bacteria

How to use
2.5ml spoon for 50L of water
Usually 1 treatment is sufficient. For resistant case of ich infection, please repeat treatment after every 3 days (with 25% water change), for a maximum duration of 14 days.
Remove activated carbon during treatment for best effect

CASE STUDY
White spots (ich) are found on new batch of fishes that we place into a 100L planted aquaria. Clearly, there are many white spots found on the body and fins. It will be difficult to remove all the infected tetras, so our housekeeping team decided to use EIHO ICH-EX. 

We add 5ml powder to a small cup. (2.5ml to 50L of water) Add in water and mix the powder. Not all the powder will dissolve immediately.


We add the ICH-EX suspension mixture into the tank directly.


Unlike, most other anti white spot medication, ICH-EX will not dye the water of the aquarium


After 24hours of adding ICH-EX, none of the tetras has white spot on the body or fins. The fishes appears healthy and is eating as usual. We add another dose of ICH-EX on the 3rd day to prevent further outbreak.


Photo taken on the 3rd day, shrimp and plants are not affected and are still growing happily.


Friday, September 19, 2014

Kudeng Surface Skimmer

No more mucky yucky oil film in your aquarium water surface! Kudeng new elegent stainless steel oil film cleaner simply remove surface oil film and dirt that is commonly found in most aquarium.
Furthermore, it is an plug and play device and runs on its own. Do not waste your time to attach to any filter or overflow system. 

It is miniature in design but it can be used to clean up to 3ft tank.
It dimension is approximate 11cm x 3.5cm
It is make of fully superior-grade rust proof stainless steel.

Price at a cool $120

Pump of the Oil Film Cleaner are replaceable

We have displayed @ EOA Store, We welcome you to view the oil film cleaner skimming in one of our planted aquarium.
Great to view! Great to use!